Powerful. Professsional. Easy.
Super easy.
If that's what you're looking for in a website, Blogger might just be your best bet. It has fewer options that other CMS (content management system) options like WordPress and Joomla. In fact, it might not even be a full CMS. But it is an excellent option for someone wanting a quick and easy web presence that still looks great.
Before you get too excited, Blogger is somewhat limited in functionality. It doesn't have all the bells and whistles that WordPress, Joomla, and even plain old HTML have, but it has everything you need to get started.
To get started, you first need a Google (aka, Gmail) account.
- If you don't already have one, you can get that buy going to www.Gmail.com or www.Blogger.com and clicking the "Sign Up" button. Follow the steps provided and create your account. Soon you'll be looking at your new Gmail account.
- If you do have one, you're all set. Just log in.
Depending on the age of your Gmail account, you could be looking at one of several different screens, but it's probably one of the two following screens. Follow the instructions for the screen that looks most like yours. Step 1A seems to be more common for newer Gmail accounts while Step 1B is common on older Gmail accounts and those domains hosted through a Google Apps account.
Step 1A - Starting Blogger From a Newer Gmail Account
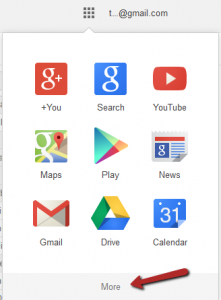
Near the upper-right side of your screen, you'll see a small 3x3 grid of squares. If you hover over it, the tip text will display "Apps." Click on it to get a menu of additional applications available to you.
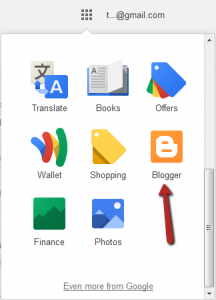
Depending on how many apps you have loaded, you may need to click the "More" link at the bottom to move to a second page. That's where my Blogger icon was located (see below). Once you find it, click on it.
If this is how yours looked, scroll on down to step 2.
Step 1B - Starting Blogger From an Older Gmail Account
Some older Gmail accounts and Google Apps accounts (where you host your domain at Google) have a slightly different look to their Gmail interfaces. If yours doesn't look like the images above, see if this is more familiar.
Across the top of your Gmail screen there will be a black bar (it could be another color if you've customized your theme). It will probably begin with your first name and a plus sign ("Tracy+" in my case) and then move on to have menu items like "Search," "Images," "Mail," and so forth. At the end of the line there will be a dropdown menu for "More." Click that.
![]() Look down the additional list of menu options until you find "Blogger" and click on it.
Look down the additional list of menu options until you find "Blogger" and click on it.
Step 2 - Create Your First Blogger Blog
Once you're into Blogger, all screens look the same. Well, at least all the screens I've seen. You should see a button that says "New Blog." Click it to begin the blog creation wizard.
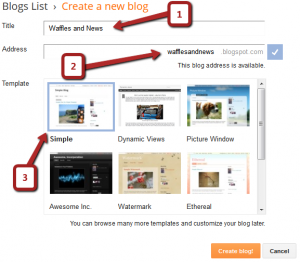
In the wizard, choose a title for your blog (you can change this later through the "Settings" menu) and type it into the field labeled "1" (see below). This title will be displayed as the masthead of your blog (unless you change the layout).
Then choose an address and type it into field "2." If you're going to use a custom domain, that's fine, you can do that later. For now, just use the domain name (without the extension) as the blog address. If you're not using a custom domain, choose an address that makes sense. I nearly always use my blog title, but without any spaces. Like the title, this can be changed later in through options in the "Settings" menu.
And finally, in field "3," chose a template. I nearly always start with either Simple or Picture Window. Like the other settings above, this can also be changed to your heart's content, but in this case changes happen in the "Template" menu.
Now click the "Create blog!" button and you're almost there.
Step 3 - Start Blogging
You'll see your first blog followed by three buttons. The first is a pencil. From here you can always create a new blog post. The second is your main menu. If you click the button with the icon that looks like a piece of paper, you'll go to your list of posts and see your full menu of options to the left. The dropdown menu (down arrow) attached to that button is a shortcut to all the options of your main menu. The final button, as it says, takes you to view your blog in the same manner that your visitors will see it.
So what's next? Click that pencil button and write your first blog post. Then drop back by here, leave me a note, and I'll read your post.
Happy blogging!


