I don't know about you, but I seem to live in my email. It's my reminder system, my todo list, my idea notebook, my photo file ... oh, and it actually provides this weird "electronic letter delivery system" that I use all day long for personal and work communication.
Blogging via email seems like an obvious addition to my email-centric day. If you're using Blogger (Google's blogging tool,) it's a pretty simple process as they provide each blog with a unique email address for this purpose.
If you are a WordPress user you'll have to install a plugin to enable this handy feature. While there are several plugins out there, Postie seems to be the king of WordPress blogging via email. Beyond the obvious -- put text onto your blog by sending an email -- it has a lot of very rich features. Of course, with rich features sometimes there comes "additional setup required." But the steps are pretty simple and we'll run through most of them right here. All together, you'll be up and blogging via email in under a half hour. It would probably take less time, but I'll outline a few options and by the time you read about them and think about them, we'll bump up the time a bit.
Before the tutorial, I'll give a brief, overall review of Postie.
Note - this blog post was created using Postie.
Postie Review
The Good
What a fantastic little tool this is. If you live in your email client, this might be the best way to post to your blog.
Postie is feature rich and gives you all kinds of control over your blog posts. You can set your categories and tags, schedule post times, place images where you want them, caption your images, customize the post excerpt and more.
On top of all that, it's free. The author does, of course, accept donations and it's well worth a quick donation.
The Could-Be-Improved
I can't say anything bad about this neat little plugin. But there are a couple of areas that could be improved. Of course, these are areas that are specific to the way I use WordPress and might not impact other people.
The first has to do with a feature in my theme (which is a feature in a number of themes.) The Featured Image for each of my posts is used as a thumbnail on the blog listing page and is then repeated as the first image in the post itself. Any image attached to your post that is not used in the post through an #imgX# place holder is listed at the end of the post. For me, this is a problem because I don't necessarily want my featured image repeated in the blog post. However, if you do want your feature image repeated in the blog post and your theme doesn't do it for you, this becomes a feature because Postie will do it. You'll see my feature image repeated below at the bottom of this post (I could have deleted it through the WordPress dashboard, but left it so you'd see what I was talking about.)
For me, I'd like the option to turn that off because I could still manually insert the image through the place holder tag.
The second area that is a problem for me is that I LOVE the WordPress SEO plugin by Yoast. When posting through Postie, I don't get the SEO analysis that my plugin provides. Of course, I can always set the post status to draft in the email, email in my post, and then do the SEO analysis through WordPress (which is what I did on this post.) But if I'm going to write the post in my email client and then immediately go check the SEO, I might as well have just written the post through the WordPress dashboard.
However, I could see this being a very useful system if you're posting to your blog from work ... shame on you! 😉 ... and can't access your blog's dashboard due to your office's network security setting. Or perhaps you just don't want someone walking up behind you while you're in WordPress but typing an email is such a common activity that no one would think anything about it. Then you could check the SEO later on a break or at lunch.
Prepping for Postie
Step 1 - An Email Address
To get started, you'll need an email address to receive your email posts. I suppose you could use your personal address, but I don't recommend that. I strongly recommend that you create a new email address that is just for receiving your blog posts. While you're at it, I recommend you make it something unique. If your name is John, I wouldn't make your Postie address John2 or even JohnPostie. If you're like me, you might send yourself or someone else named John an email, type in "Joh" and hit the enter key to move forward. If you email then selects your Postie address, you'll be automatically blogging whatever was in that email.
I created a very unique email address that combined my blog name with the word Postie. It's easy to remember because I just start typing the blog name and my email program (GMail) automatically grabs the right address with no fear of me accidentally emailing someone else.
Note - If your blog is hosted at GoDaddy, you need to use an email address at GoDaddy. Apparently, GoDaddy prevents your blog from trying to read outside email accounts. This is for security purposes. If you're hosting somewhere else, you can use GMail or some other service for the email recipient account. Of course, if you're hosting at GoDaddy you probably have more email addresses than you know what to do with so you might as well use one of those.
Step 2 - Install Postie
Now that you have your receiving email account created, let's install Postie. Jump into your WordPress Dashboard, click on Plugins, click on Add New, and then search for Postie. It should be the first item returned in your results, but to confirm it, the author is Wayne Allen.
Click the Install Now link and then click the Activate Plugin link once it's installed.
Now you'll probably see a message near the top telling you that Postie is nearly ready, it just needs to be configured. You can either click on the link it provides there or, for future reference when you need to go in and configure Postie, you can get to it through the Dashboard->Settings menu.
Step 3 - Configure Postie
There are several settings you'll need to make to get Postie working and then a few you might want to make so that it will work the way you work.
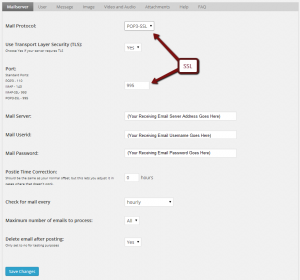
The first settings are on the Mailserver tab and tell it how to check the email account you set up in Step 1. You'll need to provide your mail server, email account user name, and email account password. In addition, if you want to use SSL (secured email,) you'll need to configure the mail protocol and port (see the image to the right.) For GoDaddy users, SSL is not an option. Just go with regular POP3.
Another setting of note on the Mailserver tab is how often you want Postie to check your email for new posts. Since I post about once a week, I set mine to daily. I considered weekly, but if I sent an email post right after the weekly mail check, Postie wouldn't find it until a week later. For more prolific bloggers, there are options like hourly, twice an hour, every ten minutes, and every five minutes.
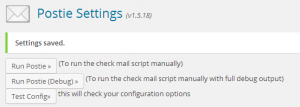
After saving your Mailserver settings, it's a good idea to go ahead and click on the Test Config button (see image below.)
User the User tab, you can choose who can post to your blog. Any user on your WordPress site can be configured to post. You can even allow anyone who emails that address to have their email posted to your blog. As the configuration screen says, though, this is not recommended.
The Messages tab holds some important options. Some are pretty self-explanatory, but a few might need a brief explanation.
If you plan to highlight text in your posts with bold faced text, sub-headings (H1, H2, etc,) or even hyperlinks, there are a couple of ways to accomplish this. The first would be for you to type your message in plain HTML (hypertext markup language ... which is what websites use to translate your messages.) This is gives you a lot of flexibility, but it might have more of a learning curve than you're interested in conquering. The other option is to write your post as though you were sending the email to a friend, and just bold face, italicize, or color your text as you normally would. You can also insert hyperlinks when needed. This is much simpler, it just lacks the flexibility of HTML. To enable the easier method, set the Preferred Text Type to "html" from the dropdown list. If you want to type the HTML yourself, choose "plain." Postie defaults to "plain" when you first install the plugin.
I know this might seem a bit backwards, but what it's asking is "are you sending me plain text that I can convert to HTML or are you sending me pre-formatted HTML."
The second is the Filter newlines option. This comes defaulted to "yes." When I tried my first post, it stripped out all of my paragraph breaks and packed my entire post into one giant paragraph. That was definitely not the look I was going for. Changing this option to "no" fixed that for me.
And finally, the Images tab is another important one. The only change I made here was the layout of the images. In my blog posts, I like the images aligned with the right margin. My theme automatically puts the featured image on every post and aligns it to the left, so I normally put other images on the right to differentiate them a little. There are a number of image options, and the Postie setup screen gives you a nice preview of each of them. My only change was to select "custom" from the Image Template dropdown list and the change the class (in the text box below the dropdown) to read "alignright" instead of "alignleft.")
For more detailed instructions on Postie and it's vast array of features, the plugin homepage (http://wordpress.org/plugins/postie/) has lots of information.
Step 4 - Blog Via Email
It's time to send your first blog post.
Write your post just as you would an email except don't include the images. When you want an image, put in the image place holder text (by default it's #img1# where the 1 is the number of the image in the attachments of the email. If your theme uses a Featured Image, as mine does, you can specify on the Image setup tab that the first image be the featured image.
Once you've sent the email, click the Run Postie button in the settings screen in WordPress (see image at right.) It should show you that it was able to retrieve an email and create the post. Then check your blog and see the magical things that Postie can do.
The Quick Takeaway
Postie is a fantastic little tool for anyone with a desire to post to their blog through email. It's very flexible and does an excellent job. Give it a try!


